Tag Archives: mobility

Back Pain?

Back pain? Spasms? Everything hurts? It’s the worst! Having a back injury can be really debilitating. If you go to the doctor and they don’t find anything wrong and just prescribe you painkillers, you might be thinking you’re all set. Unfortunately, painkillers are just a bandaid for the symptoms. You still have to strengthen and rehab your back.

There are many potential underlying causes of back pain. You may have a bulging disc. You may have a strained muscle. Your muscles could be weak. The muscles could be hypertonic. There could be a muscle imbalance. Something could be out of place. Whatever the case, there are some general things that you can do to improve your back problem. I’m no doctor but I’ve dealt with my own back problems and helped others over the years by following some of these basic rules.

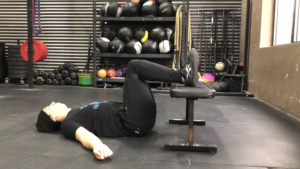
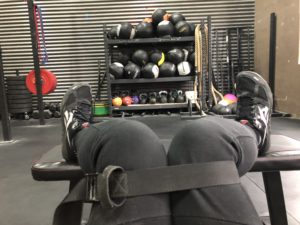
First thing is relax. Usually when you’re in a state of pain, you stress out. Once you’re stressed it heightens the pain. Lay down on your back, bend your knees to 90 degrees, and elevate your feet on a chair or couch so that your thighs are perpendicular to the floor and your shins are parallel to the floor. I also recommend internally rotating your thighs by keeping your knees close together and your feet apart. I sometimes use a strap to gently tie my knees together and use the back of the couch or chair to block my feet from coming together. Close your eyes and breathe deeply. Deep breathing through the nose using abdominal-thoracic breaths will help you stimulate your parasympathetic nervous system. This helps the body relax and helps quiet the pain response and helps muscles that are in spasm relax.

Three Abodes of Breath from Force Distance Time on Vimeo.

The next thing I recommend is to stay in motion. Sitting for long periods of time will cause your hip flexors to tighten and they can put a lot of stress on your lower back the moment you try to stand back up. Try to minimize the time you spend seated. When you do get up, try to move slowly at first, then try to walk around for as long as possible before you try to sit again.

The next thing I recommend is trying to increase blood flow and circulation to the area. The low budget approach to this is doing some cobra pushups. I recommend 3 sets of 15 or more reps with a 2-second pause at the top. They are simple. You lie prone on the floor with your hands next to your chest pressed into the floor like you are about to do a pushup. You squeeze your shoulders down and back, curl your chest up, squeeze your butt, then press your arms straight. Keep your butt squeezed and try to keep your hips close to the ground. The contractions of the glutes and lower back will warm the area and bring blood to the area.

Cobra Pushups from Force Distance Time on Vimeo.

If things are so bad that you cannot move without pain, then you need to find other ways to stimulate the muscles and create some blood flow. I like to use an electrical stimulation unit like a Powerdot or a Marc Pro that stimulates low level muscle contractions and helps create muscular activation without the pain that may be associate with moving. Once the muscles are stimulated and warm, you can then begin to move without pain. This is a good protocol if you have access to a muscle stimulator and can place the electrode pads on your back by yourself. You may require assistance and a small loan (worth it!) to purchase a stim unit.

Another way to stimulate blood flow to the area is through cupping or scraping. Cupping involves putting small cups on your back that have the air sucked out so it creates a vacuum. The vacuum draws the skin up and away from the superficial fascia and creates some bruising like a hickey. That bruising is what brings blood to the area. Scraping is another protocol (sometimes called gua sha or Graston) that uses an instrument (like a spoon or dull metal blade) to create soft tissue mobilization. Basically scraping the skin to create a sheer force between the skin and the superficial fascia. The result is again more blood flow and sometimes some bruising. The downside is that you will need someone to do these to you as most people cannot adequately perform these on their own lower backs.

Things to avoid are over stretching. Stretching has its place but is often over used. The problem with stretching is that it often feels good in the moment. Unfortunately, once the moment has passed, the pain often returns and is worse. This is especially true for certain disc injuries. So consider doing some stretches and exercises where you focus on keeping your spine in a neutral position and only move about the hip and shoulder.

Try these hip hinges and isolated hip circles to improve mobility without aggravating your spine.

Hip Hinges from Force Distance Time on Vimeo.

Isolated Hip Rotations from Force Distance Time on Vimeo.

Joint Preparation: Wrists and Forearms

Joint Preparation is strengthening the connective tissues around the joints: the tendons and ligaments. This is different than strengthening the muscles. Muscle tissues regenerate in about 90 days, connective tissue takes closer to 210 days to regenerate. Connective tissue has one-tenth the metabolic rate of muscle that means it takes 10 times longer to heal when it’s injured. The reason I prioritize joint preparation is because Brazilian Jiu-Jitsu (BJJ), by its nature, is based on causing trauma to the joints (armlocks, leglocks and neck cranks), therefore, strengthening connective tissue is a priority if one is to have longevity in the sport. Since it takes a really long time to regenerate connective tissue you need to prepare your joints consistently over a long period of time.

If you look at sports injuries in general, they tend to occur at end range of the joint where the muscles, tendons and ligaments are stretched to their fullest and are therefore their weakest. So joint preparation is basically end range strengthening and conditioning. This can look like weighted stretching or may take the form of various exercises that move the joints through full ranges of motion. By gradually loading the tissues at end range we can condition them to be stronger and more resilient in those positions.

In this article, I will take you through some of my favorite things to do to condition my wrists and forearms. Doing these will help your wrists stay strong and healthy over the years of doing BJJ.

Forearm Blast
This series of exercises will warm up your hands and forearms better than any other exercise I have ever done. There are five exercises that I show on this video. You begin with your arms straight out in front of you and you extend your wrists like you are pushing against a heavy door. Stretch you fingers as long and wide as you can and then make a tight fist while keeping your wrist bent back. Repeat this as fast as you can while trying to extend and flex your fingers as much as you can. Go as long as you can manage. You want to work towards being able to go for a minute. Then repeat this with your wrist flexed and your fingers pointing down at the floor. Now it gets more interesting, bend your elbows 90 degrees like you are a T-Rex and repeat the two variations (fingers up and fingers down). Lastly, with your elbows bent quickly flip your hands over, palms up and palms down, as fast as you can. This works the supination and pronation of the forearm. This whole sequence should take you less than 5 minutes. At first your forearms will feel swollen and tight like Popeye, but then after a minute the hands and wrists will feel really warm and loose. You are probably wondering if the burning sensation in your forearms is normal and healthy. Yeah, kind of. You have many muscles in your forearms that are encased in fascia and all those muscles should be able to slide and glide against each other and move independently. When we do these exercises we become aware that we do not have as much slide and glide as we should. The friction between these surfaces causes a lot of heat. Doing the joint preparation and assisted recovery (my next blog post) will help and you will soon notice that you can go longer and longer with this exercise.

Forearm Blast from Force Distance Time on Vimeo.

Wrist Stretches
Now that you are warmed up, we can stretch the wrists a little. These stretches are good to help increase some range of motion and also to start loading the joints with a little bit of weight. The four stretches I show on video can all be done from the knees and do not take very long. I recommend doing 10 gentle pulses into each stretch and then holding the last rep for 30 seconds.

Forearm Blast: Part 2 from Force Distance Time on Vimeo.

Wrist Push-Ups
These wrist push-ups are extremely challenging, but they will build very strong wrists that can withstand a lot of abuse. I recommend starting these standing up against the wall and only doing 1 hand at a time initially (The other hand was just doing a regular pushup. Don’t try to do 1-arm wrist pushups, you fucking savage!). That is how I learned them. Eventually, I was able to do them with both hands simultaneously standing at the wall, then I started doing them from my knees on the floor with one hand and then eventually with both hands. I was at the point where I could do them from my toes, but then I hurt my wrist and had to start back from square one. Even though these exercises didn’t prevent me from getting injured, by scaling back to very light versions of these, I was able to get my wrist back to 100% in a very short period of time. Work up to 5 sets of 5 of each variation. Start with the standing variations first before going to your knees. Also do not be in a hurry. These exercises are for the connective tissues that take a long time to regenerate. You will not see huge wrist muscles all of a sudden. You have to be patient and even if you think the variation is too easy, make sure you can do 5 sets of 5 with perfect form before trying to advance. Even if you stayed at the easiest variation and did them once a week for a year, in a year you wrists would be much stronger and healthier.

Forearm Blast: Part 3 from Force Distance Time on Vimeo.

Day 13 – The Veal 

You knew this day would come. You probably hoped I would forget. Not a chance! Today we are going to smash our calves. Your tight calves are the result of your shoes, the way you walk, the way you exercise, how little you move, genetics and many, many other factors. However, a little bit of soft tissue work on a regular basis can be the thing that keeps you running strong for years to come.

In order to make your calves nice and tender it will take time and pressure. Hence we call this move “The Veal.” Set yourself up on a chair or bench and place a Yoga Tune Up® ball behind your knee and sit down and wait. Breathe deeply and use that time and pressure to tenderize those calves. Don’t be in a rush. Lean from side to side. Keep the foot dangling over the edge and move it slowly. Reposition the ball occasionally and find those sweet spots.

Check in and check out with your air squat or a standing forward bend and see how that ankle flexibility is after trying the veal.

The rules for the Ball Fucking Harder Challenge are easy. First, I recommend getting some Yoga Tune Up® balls to roll on. All you have to do is post a pic or video of yourself doing the technique and tag me (@coachpanda). Use the hashtags #ballfuckingharder #30daypandachallenge #supplepandas #pandiculation. The challenge is even better when you share it with friends so tag your friends to play along.

Day 13 of 30. The Veal from Force Distance Time on Vimeo.

Day 12 – The Minor Pecker Wrecker

Your pec minor is ruining your life. It makes you slouch and keeps you from being able to move like you’re supposed to move. You probably shouldn’t have it removed though because you will need it eventually. Your best bet is to bend it to your will. Take a Yoga Tune Up® Alpha ball and dig it in there real good. Then move that shoulder joint and get that pec to release it’s hold on the front of your humerus. Do this move in a doorway or a corner or a squat rack, or, if you’re a real masochist, you can do this laying face down on the floor on top of the alpha ball (you sicko!). Pin and stretch the muscle by applying deep pressure and moving the arm through various ranges of motion.

Here’s a tip for finding the pec minor. Take your left elbow and lift it out to the side like a chicken wing (abduction). Reach across your chest with your right hand and put four fingers into your left armpit and grab the front wall of your arm pit and pull it forward. That piece of meat is your pectoralis muscle. Where your thumb closes and presses into the front is your pec minor. Place the ball right where your thumb is pressing.

The check in and check out is to test your overhead position and/or your extension position (arms lifted in back of your body).

The rules for the Ball Fucking Harder Challenge are easy. First, I recommend getting some Yoga Tune Up® balls to roll on. All you have to do is post a pic or video of yourself doing the technique and tag me (@coachpanda). Use the hashtags #ballfuckingharder #30daypandachallenge #supplepandas #pandiculation. The challenge is even better when you share it with friends so tag your friends to play along.

Day 12 of 30. The Minor Pecker Wrecker from Force Distance Time on Vimeo.

Day 11 – Pocket Pool

Your hip flexors are tight and you know it. You sit in your car while you drive to your job where you sit all day, then you drive home and sit in front of the tv. What did you expect would happen to your hip flexors? Now it’s time to undo some of that tightness. Today we are going to play some Pocket Pool to release the tensor fasciae latae with a Yoga Tune Up® Alpha ball. You begin laying on your side with the Alpha under the side of your hip. You should be propped up on your elbow and bend your top leg and place the foot on the floor for extra support. Take a deep breathe and turn your chest and hips toward the floor going almost totally prone. The goal is take the Alpha across the TFL fibers by trying to roll it into your front pocket. Breath slowly and take your time because you have many hours of sitting to undo.

Check and recheck your standing posture and your squat before and after balling both sides of the hip. You should feel like you’re standing straighter with better posture and you should feel much more comfortable in the bottom of your squat as well.

The rules for the Ball Fucking Harder Challenge are easy. First, I recommend getting some Yoga Tune Up® balls to roll on. All you have to do is post a pic or video of yourself doing the technique and tag me (@coachpanda). Use the hashtags #ballfuckingharder #30daypandachallenge #supplepandas #pandiculation. The challenge is even better when you share it with friends so tag your friends to play along.

Day 11 of 30. Pocket Pool from Force Distance Time on Vimeo.

Day 6 – The Mermaid(man)

Today we are going after the abdominals. We are using a Yoga Tune Up® Coregeous ball. If you don’t have one, grab an inflatable dodgeball or something from your kid’s toy chest. You are going to lie on your side like a mermaid or merman and place the ball to the side of your belly button. The reason I have my shirt off is that the ball in contact with the skin will create some nice warm shear forces also because I’m a crossfitter and we don’t wear shirts. You should feel like your abs are being pushed to the other side of your torso. Breathe big belly breathes into the ball and exhale slowly and completely and let the ball sink in more on each exhale. Stay relaxed and soft. Occasionally change your position slightly to get a different vector on the pressure.

This technique has a huge down-regulating effect. You will most likely be very sleepy and relaxed after doing this. I recommend doing it before bed to get a restful sleep. That will be the best test of whether this was effective. However, a word of caution, some people get very uneasy and emotional doing deep abdominal work. That’s perfectly fine if that happens. Take some quiet time to yourself if you start catching all the feels.

The rules for the Ball Fucking Harder Challenge are easy. First, I recommend getting some Yoga Tune Up® balls to roll on. All you have to do is post a pic or video of yourself doing the technique and tag me (@coachpanda). Use the hashtags #ballfuckingharder #30daypandachallenge #supplepandas #pandiculation. The challenge is even better when you share it with friends so tag your friends to play along.

Day 6 of 30. The Mermaid(Man) from Force Distance Time on Vimeo.

Day 5 – The Oompa Loompa

I don’t know anybody that doesn’t carry tension in their upper back and traps. This rolling technique is just the ticket to loosen up that tension you’ve been carrying around all day. I suggest using a Yoga Tune Up® Alpha ball for this. Start with your back against a wall and squat down a little. Place the Alpha ball behind your back to the right or left of your spine up between the shoulder blades. Bridge your hips away from the wall so you can press your weight into the ball. Now start to bob up and down like an oompa loompa as you push with your legs. The real money maker is rolling the ball up onto your shoulder like a parrot. In order to do this you have to turn slowly as you lower into your squat. The ball will cross the muscle fibers of the levator scapula as well as the upper trapezius. It’s very intense. Move slowly and deeply and with purpose. Breathe deeply.

Check in and Check out with either your overhead position or simply look at your posture in the mirror between sides. I often see a visible difference in the height of my shoulders after doing this for just a few minutes. The side you just rolled will often be lower than the unrolled side.

The rules for the Ball Fucking Harder Challenge are easy. First, I recommend getting some Yoga Tune Up® balls to roll on. All you have to do is post a pic or video of yourself doing the technique and tag me (@coachpanda). Use the hashtags #ballfuckingharder #30daypandachallenge #supplepandas #pandiculation. The challenge is even better when you share it with friends so tag your friends to play along.

Day 5 of 30. The Oompa Loompa from Force Distance Time on Vimeo.

Day 4 – The Tiny Conductor

I don’t know why my forearms are always sore, but I think it has something to do with barbells, pull-up bars, rings, ropes, kettlebells, dumbbells and jiu-jitsu…basically everything I do. So this is my first move when I roll out my forearms. It’s easy. You take a Yoga Tune Up® therapy ball and place it on your forearm and lean against a wall. I move around until I find a gnarly knot and then I put my weight into it because I want to Ball Fucking Harder. Breathe deeply and apply pressure. Then to really take things to the next level, I move my wrist like a tiny conductor. This pin and stretch technique is totally legit. You will love it.

Check in and check out with either the front rack or the overhead position. This technique will feed slack into your shoulders and wrists and will help alleviate some elbow and wrist pain. Roll for at least two minutes on each side.

The rules for the Ball Fucking Harder Challenge are easy. First, I recommend getting some Yoga Tune Up® balls to roll on. All you have to do is post a pic or video of yourself doing the technique and tag me (@coachpanda). Use the hashtags #ballfuckingharder #30daypandachallenge #supplepandas #pandiculation. The challenge is even better when you share it with friends so tag your friends to play along.

The Tiny Conductor from Force Distance Time on Vimeo.

Day 3 – The Childproof Lid

If you do CrossFit, then your hands are going to get quite a workout. We use our grip constantly, but how often do we take care of our hands? Most people just wait until their hands rip and then put some lotion on them. That’s not enough. The fascia in your hands is beat up. You need to resuscitate your hands with this awesome technique.

Use a small Yoga Tune Up® classic ball and place it on the floor. Kneel down and interlace one hand over the other like you’re about to give chest compressions in CPR class. With straight elbows, lean your weight straight down on the ball and then twist your hand back and forth like you’re trying to open a childproof lid on a prescription bottle. This move creates a lot of sheer force on the fascia and brings a ton of blood flow to the hands. It will release all the tension you have stored up in your hands and feed slack all the way up to your shoulders. Get the entire surface of each palm and spend at least 2 minutes per hand.

Check in and check out with either your front rack or your overhead position. You should notice a dramatic improvement. In fact, check out the difference after only rolling one hand and you should see a visible improvement compared to the unrolled side.

The rules for the Ball Fucking Harder Challenge are easy. First, I recommend getting some Yoga Tune Up® balls to roll on. All you have to do is post a pic or video of yourself doing the technique and tag me (@coachpanda). Use the hashtags #ballfuckingharder #30daypandachallenge #supplepandas #pandiculation. The challenge is even better when you share it with friends so tag your friends to play along.

The Childproof Lid from Force Distance Time on Vimeo.

Day 2 – Orbiting The Moon

Face it! You sit on your butt way too much. All that sitting makes your glutes useless. You need to wake them up and get the blood flowing down there. This is a simple technique I call “Orbiting The Moon.” I am using a Yoga Tune Up® Alpha Ball for this one, but you can use any ball you have lying around. The Alpha is the best one for the job though. Just like yesterday, check in/check out with a standing forward bend. Notice how close you are to touching your toes and notice how restricted you are in the glutes and hamstrings. Pay close attention to how much more range you have and how much better it feels when you’re done.

The technique is simple. Sit on your Alpha ball and slowly orbit the entire moon. I like to move out in concentric circles starting at my ischial tuberosity (a/k/a my sit bone). I move in a clockwise orbit for about a minute and then switch to a counter-clockwise orbit for the next minute. After about 2 minutes, switch to the other cheek. Breathe deeply and slowly. If it is too intense, you can do this standing and leaning against a wall.

The rules for the Ball Fucking Harder Challenge are easy. First, I recommend getting some Yoga Tune Up® balls to roll on.  All you have to do is post a pic or video of yourself doing the technique and tag me (@coachpanda).  Use the hashtags #ballfuckingharder #30daypandachallenge #supplepandas #pandiculation.  The challenge is even better when you share it with friends so tag your friends to play along.