Category Archives: Technique

Breathe Fucking Harder

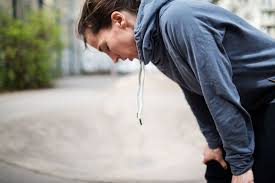
Breathing is a funny thing. We do it all day long out of necessity and rarely give it much thought. However, just because we do it so often doesn’t necessarily mean we are good at it nor are we getting better at it. In fact, I find that a lot of people suffer from “bad breath.” Their breathing patterns are less than stellar. So what? You may ask.
images-1
The thing about our breath is that it is linked to our central nervous system; it is tied to physical performance; it is tied our movements; and it is tied to our pain. We can utilize the breath to up-regulate our nervous system or down-regulate our nervous system. We can move in ways that help or hinder our breath. We can use our breath to help alleviate our pain or to mask it.

Our main respiratory muscle is the diaphragm. The diaphragm is a key player not only in breath but also in spinal stabilization as it is used to create intra-abdominal pressure. When I assess clients that have chronic pain and/or movement dysfunction they often have “bad breath,” i.e. poor breathing mechanics and poor control of their diaphragm. By teaching people how to breathe properly, I can get them to down regulate and create a physiological state where healing can occur. Proper breathing allows me to better help them stabilize and protect their spines which leads to better, pain-free movement and helps me teach them better movement patterns.

For example, you twist your ankle and it hurts to walk on. Maybe you tore a ligament or strained muscle, you don’t know. All you know is that it hurts. Maybe you went to the doctor, maybe you didn’t. Maybe you took pain killers. It doesn’t matter. Your body senses pain in your foot. Every time you try to walk on it, you wince a little and your body braces itself. It stiffens. You hold your breath a little with each step. You compensate by placing more weight on the other leg and your hips shift with every step. That means your lower back is supported more on one side than the other. After a few days of this, you don’t even know you are compensating and your brain starts to filter out the noise coming from that achy ankle because now you can pretty much get through your day. Six months later your lower back is hurting all the time. You think it’s unrelated. Turns out it is from all the compensating you’ve done to avoid stress on your bad ankle that hasn’t healed.

So are you saying that learning to breathe better will fix my lower back? Not exactly. If you learn to breathe better, you can start to relax a little. That’s important because when you are stress breathing you are up-regulating your sympathetic nervous system (“fight or flight”) and releasing stress hormones. When you learn how to do abdominal-thoracic breathing you down-regulate and activate your parasympathetic nervous system (“rest and digest”) and get back to homeostasis and this allows your body to better heal itself. Furthermore, once we get you to breathe deeply we can then create some intra-abdominal pressure and teach you how to stabilize your spine. Often that helps relieve some of the back pain. Once your spine is stabilized when you stand you won’t shift your weight over and you will put weight on both feet then suddenly you will realize your ankle still hurts. Finally you can start doing something about that ankle.

images

This all seems convoluted. It is. The body is a complex system of systems. That is why many people suffer injuries over and over or constantly find themselves getting stalled in their progress. The pain isn’t where the problem started. The pain is where the problem stopped. Going back to the start of the pain is the hard part. Breathing is just one of the vehicles that help us on that journey.

From a practical and functional standpoint, you need to breathe deeper so you can perform better. Learning how to take longer, deeper breaths and create and utilize the full capacity of the lungs is essential to performance. Strengthening the diaphragm is also important because that is one of the stabilizers of the spine. If your spine isn’t stable, you are going to have big problems.

Three Abodes of Breath from Force Distance Time on Vimeo.

The Three Abodes of Breath

imgres

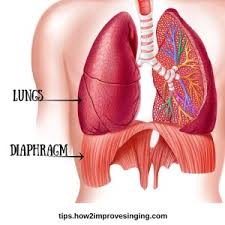
As I eluded to before, there are several ways to breathe. The body being intelligent has redundancies built in so that we can always find a way to breathe. See the video above. The first abode is abdominal breathing. In abdominal breathing we utilize the diaphragm to draw air into the lungs. When the central tendon of the diaphragm contracts, it pulls the giant umbrella shaped muscle down and creates a low pressure system in the lungs. The lungs then draw air in air to balance the pressure. Lie comfortably on your back with your knees bent and feet close to your butt. Place one hand on the belly and one hand on the chest. Inhale into the belly and it should rise up under your hand. Exhale and the belly should fall.

shutterstock23857276copy

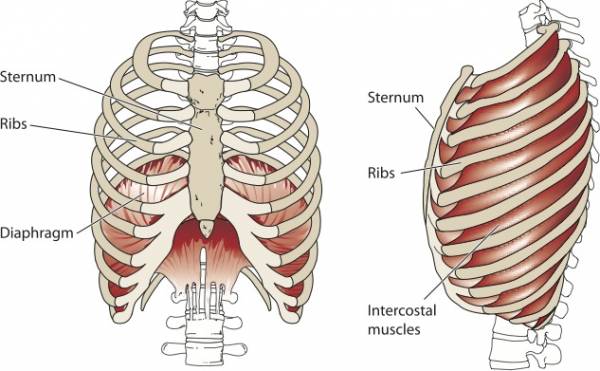
The second abode is thoracic breathing. Thoracic breathing utilizes the intercostal muscles between the ribs to expand the rib cage. The increased diameter of the rib cage creates low pressure in the thoracic cavity and draws air in. Inhale into your chest. The chest should rise up into your hand. You might also feel the back of your ribs press into the floor. ‘

The third abode is clavicular breathing. Clavicular breathing utilizes the levator scapulae and the trapezius muscles to draw the shoulders upward and create low pressure in the upper thoracic cavity and draw air in. Clavicular breathing is associated with stress breathing and panting. It tends to be very shallow. Breath into your shoulders. The shoulders with rise up into your ears. This is called clavicular breathing and should be used infrequently as it is often associated with panic breathing. Unfortunately, many people chronically practice clavicular breathing and are stressed out. Furthermore, they often suffer a lot of shoulder problems because of the overused trapezius muscles that should be doing other things besides helping you breathe all day.

Abdominal Thoracic Breathing

Practice isolating each abode of breath. Compare the sensations associated with each abode. Which one allows you to breathe deepest and which one stresses you out. Now practice abdominal-thoracic breathing. Lie on your back with your eyes closed. Bend your knees and place your heels close to your butt. Place one hand on the belly and one hand on the chest. As you inhale you should feel the belly rise up into your hand first and then the chest rise up into the other hand. On the exhale the chest descends then the belly. Continue breathing like this for 10 cycles. Go as slow as you can comfortably.

You should feel calm and relaxed afterwards. If you find it difficult to breathe like this, you need more practice. Most people try too hard at first which actually makes it more difficult to breathe. Do less. Abdominal-thoracic breathing should be your normal relaxed breathing pattern. Chronic pain and movement dysfunction correlate highly with the inability to perform abdominal-thoracic breathing. Practice breathing this way whenever you become conscious of your breath.

Bridge Lifts

In the next exercise we put it all together and link our movement with our breath. It’s called a bridge lift (I demo these at the end of the video). We start in ardha sivasana lying on our backs with our feet by our butt. Our arms by our side. From here we inhale and lift our hips and arms up. Our hips terminate at the top of a bridge pose and our arms continue until they come to rest by our ears. On the exhale we return our hips to the floor and our arms by our sides. The goal is to synchronize the breathing with the movement. Remember the hips move much slower because they travel a much shorter distance than the arms which travel in a 180-degree arc. This is called a vini or vinyasa. The promise of vinyasa yoga is that evenly metered breath coupled with evenly metered movement will result in an even mind.

You will find that you breathe deeper in the bridge lifts because the movement helps facilitate deeper breaths. One reason is that now you are adding clavicular breathing in addition to the abdominal-thoracic breathing. As the arms rise shoulders get pulled up and help draw in more air. This is proper and normal clavicular breathing that occurs

Practice abdominal thoracic breathing and the bridge lifts and work up to sets of 10 breaths. You should feel relaxed and calm afterward. The goal is to move slower and breathe deeper. Not to go fast and get your heart rate up. Do not take your breathing for granted. There is much to be gained by mastering your breath. Some people say “Master your breath, master your life.” I say, “Breathe fucking harder!”

Day 8 – KB Armbar Stretch

The Kettlebell Armbar Stretch is a unique move. It doesn’t feel like a stretch; it’s awkward; but it leaves your shoulders feeling great. What it does is set your arm deeper in the shoulder socket essentially putting the golf ball on the tee (the humerus on the glenoid fossa). You are doing an isometric hold of the scapula in retraction and depression and letting gravity set your shoulder. Trust me, it’s worth the price of admission. You can do this with a kettlebell, dumbbell or even a band but you’re going to need some resistance to make it work. Start light until you feel comfortable and secure holding the weight, then load it up.

Use two hands to pick up the kettlebell while laying on your back. Press it up over your shoulder. Keep your core tight as you roll over onto your side. Turn your hips over and point them toward the floor. Rest your head on your arm and keep your eye on the bell. Press your shoelaces into the floor, squeeze your butt and retract and depress your scapula. Stay there for up to two minutes. Initially, you may not be able to hold the weight for that long. That’s okay. Perform the armbar stretch two or three times on each arm for as long as you feel safe holding the weight. Use both hands to lower the weight slowly and place it on the ground.

Kettlebell Armbar Stretch from Force Distance Time on Vimeo.

Here are the rules for the 30-Day Stretch Fucking Harder Challenge. Each day do the deep stretch, post it on Instagram and tag some friends to do it with you. Post your stretch with the tags: #stretchfuckingharder #supplepandas #30daypandachallenge Tag me @coachpanda. Come back here to my website or vimeo channel to see more details on each stretch and modifications and scaling options. Try to stay in each stretch for at least 2 minutes per stretch per side. Remember to breathe slowly and deeply and start gradually and move deeper over time. Back off if it hurts.

30-Day Stretch Fucking Harder Challenge.

Stretching. static1.squarespaceWe all know we should do it, yet most of us don’t do it.  Then we all have the excuse, “I’m not flexible enough to go to yoga.”  Bitch please!  Maybe you like to use the “I don’t know how to stretch” excuse.  Perhaps you are just totally defeated and think, “I will never be flexible.”  Cut that shit out!  You’re better than that.

This month I’m doing a 30-day stretching challenge.  It’s as much for me as it is for you. I know how to stretch because I taught yoga for over 10 years but I still find it hard to make myself just sit there and stretch.  I decided I’m going to challenge myself (and all of you) to stretch deeply every day this month.  Flexibility loves company so please join me.

Here’s how it works.  Every day I’ll post a new stretch to my instagram account @coachpanda and I’ll post some videos here at forcedistancetime.com explaining them in further detail.  You can also go right to my vimeo page and watch the videos that will have more instructions.  For the super tight people there will be modifications and for the super supple there will be some challenging variations.

Use cautio162311n and common sense when stretching deep, remember to take your time to watch the video and read the instructions.  Start slow and work yourself deeper into the stretch over time.  Breathe slowly and deeply through the nose. If you are holding your breath, then you’re probably going too far.  Back off until you can breathe deeply and slowly resume.  Spend at least 2 minutes in each stretch on each side.  If you find it was easy, then stay there longer, or go deeper, or try a more challenging variation.  If it hurts or feels “sketchy” or you go numb, then stop.

Since it is a “challenge,” I want to introduce you to some stretch variations that you might not have seen and use some props you might not have used.  It’s going to be an adventure.  Join me!

Here are the rules for the 30-Day Stretch Fucking Harder Challenge.  Each day do the deep stretch, post it on Instagram and tag some friends to do it with you. Post your stretch with the tags: #stretchfuckingharder #supplepandas #30daypandachallenge  Tag me @coachpanda.  Come back here to my website or vimeo channel to see more details on each stretch and modifications and scaling options.   Try to stay in each stretch for at least 2 minutes per stretch per side. Remember to breathe slowly and deeply and start gradually and move deeper over time.  Back off if it hurts.

Fix Your Deadlift Already!

Sometimes I feel like I’m being chased by a horde of rounded back zombies. As a coach who deals with regular people that want to learn to lift weights I have to deal with a lot of movement disfunction. People who have been riding a desk for years and don’t have an athletic background often find it extremely difficult to arch their backs and hinge at the hips. I get it. I can work with that. I also see a lot of CrossFitters that have been in the game a few years and still do not have a mechanically sound deadlift. What the fuck is wrong with you? If you have been knowingly deadlifting with a rounded back, you are essentially having unprotected sex with a hooker, while smoking a cigarette on your motorcycle without a helmet.

I feel like I have tried everything to get people to arch their backs when they deadlift (read: yelled a lot), but they just won’t learn. What is a coach to do?

Over the years I have come up with a bunch of different drills that I use to teach people better positions. I decided it was time to put this post together to share them with you. If you are a coach or an athlete struggling with deadlift form, these drills will help. Do them!

Please note. This is NOT the ultimate deadlift article. There are a lot of important nuances to the deadlift that I think we can simply ignore until we get our athletes to maintain a strong tight arch in the back. I believe a neutral spinal position is optimal. However, I think teaching people to be in a tight arch (slightly over extended) position is an important first step as I believe an extended spine is better than a flexed spine. Once they can deadlift with an arched back consistently and proficiently, then cueing a neutral spine is easier to achieve. After this is mastered, we can move on to other important points of performance but protecting the spine is a prerequisite essential.

Cat Cow.
This is a seemingly simple exercise that you should be doing every day just because it feels great. It also has great utility in helping clients learning the difference between arched back and rounded back and eventually being able to move all your joints better. I see many people that struggle with this basic exercise but lots of repetition is key so use it for warmups and cool downs. I add a band in the hip crease to help cue pelvic tilt. When done well you should be able to access anterior and posterior pelvic tilt as well as spinal flexion and extension throughout the lumbar, thoracic and cervical regions. Additionally, the scapulae are moved through elevation and protraction then retraction and depression. If you do not have good movement through your hips, spine or shoulders, then keep doing this exercise every day.
Set Up: on all fours with hands under the shoulders; knees under hips; elbows straight.
Execution: Inhale, anteriorly tilt the pelvis; extend the spine, retract and depress the shoulder blades. Exhale posteriorly tilt your pelvis, flex your spine, elevate and protract your shoulder blades.
Common Faults: bending the elbows; not moving the pelvis; spine or shoulders enough; forgetting to breathe.

Cat Cow from Force Distance Time on Vimeo.

Cat Cow RDL.
Once the athlete can perform perform the Cat Cow, then it is time to add additional movement patterns.  Most athletes cannot isolate hip movement from knee movement.  By kneeling we can better isolate the hip hinge.  This movement mimics a traditional Romanian Deadlift (RDL) which is essentially the top half of the deadlift.  Practice this slowly and video it to check yourself.
Set Up: on all fours with hands under the shoulders; knees under hips; elbows straight.
Execution: Inhale, anteriorly tilt the pelvis; extend the spine, retract and depress the shoulder blades. Hold the breath and sit your butt back to your heels drag your hands along the floor until they touch your knees. Exhale, squeeze your butt and open the hips and come to vertical as you slide your hands up your legs. Sit your butt back to the heels as you slide your hands back down your legs to the floor. Come forward on to all fours again.
Common Faults:  Pulling the torso to vertical too soon and allowing the hands to come off the floor as they sit their hips back to their heels; Rounding the back as they begin to move the hips; forgetting to breathe; forgetting to go through the Cat Cow stretch every time.

Cat Cow RDL from Force Distance Time on Vimeo.

Banded Good Morning: Anterior to Posterior
The Good Morning and the RDL are essentially hip hinge movements.  Hip hinging is the basis of Deadlifts, Kettlebell Swings and, to a large extent, Squats. Most people cannot disassociate the movement of the hips from the movement of the spine which is why they immediately flex their spine when you ask them to hinge.  The band in this variation gives a physical cue to the athlete for where they should be hinging from.  Watch your athlete closely to see that they are hinging about the hips and not about the spine.
Set Up: Stand with the feel between hip and shoulder width apart. Attach a band in your hip crease and step forward until there is a little tension pulling your hips back.
Execution: Arch your back and send your hips back. Keep hinging forward until you feel like your back is going to round. Allow the band to pull the hips back and feel the tension in your hamstrings. The knees should unlock to allow the hips to move back.
Common Faults:  The athlete will continue to flex at the waist and round their back; the athlete does not allow the band to pull the hips back; the knees stay locked; the knees bend and move forward; the athlete tries to squat; the athlete drops their head below their hips.

Good Morning with Band Anterior to Posterior from Force Distance Time on Vimeo.

Banded Good Morning: Posterior to Anterior
This is essentially the same as the previous Good Morning exercise but the band is placed just under the butt pulling the hips forward.  The band physically cues the athlete to push their hips back into the band.  Most athletes will benefit from both versions but most athletes will click with one or the other so try both to see which one clicks with your athlete.
Set Up: Stand with the feel between hip and shoulder width apart. Attach a band just under your buttocks at the top of the hamstring and step back until there is a little tension pulling your hips forward.
Execution: Arch your back and send your hips back. Keep hinging forward until you feel like your back is going to round. Push the band back with your butt and feel the tension in your hamstrings.
Common Faults:  The athlete tries to sit down instead of pushing their hips back; the athlete fails to push the hips back and get pulled forward on their toes; the athlete drops their head below their shoulders; the athlete rounds their back instead of hinging at the hips.   

Good Morning with Band Posterior to Anterior from Force Distance Time on Vimeo.

PVC Hip Clamp
Athletes often cannot hinge at the hips because they do not have the ability to tilt their pelvis forward.  The anterior tilt of the pelvis can actually lead to a gross exaggeration and over extension of the spine, but for the novice lifter, I feel they have to be able to do this in order to get the back to keep its arch.  Furthermore, once the athlete achieves a decent set up position, the spine and pelvis can still reverse position as the athlete begins to take the weight off the floor.  This drill builds isometric strength in the hinged position that translates perfectly to the deadlift.
Set Up: Stand with your feet between hip and shoulder width apart. Place a pvc pipe right in the crease of your hip.
Execution: Arch your back and tip your pelvis forward (anterior tilt). Hinge forward and clamp your hips down on the pvc. Take your hands off the pvc and bring them to the side of your head. Continue trying to arch the back harder by lifting your chest. Try to straighten your knees more to load the hamstrings. Try to break the pvc in the crease of your hips.  Athletes should be able to hold this position for 60 seconds.
Common Faults:  Dropping the pvc pipe; failing to tip the pelvis forward; rounding the back; squatting low to hold the pvc.

Hip Clamp from Force Distance Time on Vimeo.

Midline Stabilization Test
The optimal position for the spine is a braced neutral position.  The natural ‘S’ shape of the spine should be wed to the pelvis in an unyielding unit when we perform deadlifts (and all other functional movements).  Using the pvc is a great visual and tactile cue to tell whether their spine is maintaining its shape or whether they are letting the shape of the spine deviate as they move.  Once this drill is mastered for the deadlift, squat and push press, then the athlete is on their way to great things. Until this drill is mastered, the athlete is always performing sub optimally.
Set Up: Stand up straight with your feet under your hips. Hold a pvc pipe lengthwise along your spine. There should be three points of contact: 1) the back of your head, 2) the back of your shoulders, and 3) the buttocks. There should also be a gap between the pvc and the lower back.
Execution: Hinge at the hips slowly and maintain all three points of contact. Do not let the space at the lower back diminish as you hinge and unhinge. The spine should not change its shape throughout the entirety of the movement.
Common Faults: tilting the neck back; going to fast; rounding the back.

Midline Stabilization Test from Force Distance Time on Vimeo.

Box Deadlift: High StartOnce the athlete demonstrates competency in the previous drills, we can have them start lifting some weight.  The set up position of the deadlift is where we see things go wrong before the bar ever leaves the ground.  Athletes often struggle with the setup position because they cannot create enough stability in the legs and hips to support an arched back.  By placing the athlete on a box, the legs and hips are stable and the athlete can then access their back muscles to create a tight arch.
Set Up: Get a box that places your butt a few inches higher than your knees. Sit on the box with your feet between hip and shoulder width apart. Adjust your feet so that your shins are vertical and roll the bar against your shins.
Execution: Perform a few Cat Cow stretches with your hands on your knees. When the back is arched try to reach down and grab the bar without rounding your back. This requires hinging at the hips and not shifting the knees forward. Before you stand with the bar, try to arch your back harder by lifting your shoulders away from the floor so the arms feel like they are stretching. The bar should leave the ground at the same time the butt lifts off the box.
Common Faults: The athlete tries to lift before arching the back; the athlete rounds the back and shifts the knees forward to get their hands on the bar; the athlete rests their weight in their hands;  the bar comes off the ground before the butt leaves the box; the butt comes off the box before the bar leaves the ground.

Box Deadlift High Start from Force Distance Time on Vimeo.

Box Deadlift: Low Start
The next step is to transition from the set up on on the box to a free-standing set up.  This drill show the athlete how to set their back first and then transition to free-standing.  This drill helps those athletes that are less flexible and find it easier to set their back in a lower set up position.
Set Up: Use a box that places your hips at about the same height as your knees. Place your feet between hip and shoulder width and adjust the feet until your shins are vertical. Roll the bar back to your shins.
Execution: Perform some Cat Cow stretches and set your back in a tight arch. Lean forward and place your hands on the bar. The back should remain arched and the shoulders should be behind the bar. Lift your hips off the box by flexing at the ankles and allowing the knees and the shoulders to move slightly forward until the shoulders move just past the bar. Have the athlete press down through their feet and try to lift their shoulders away from the floor to stretch their arms as they transition off the box.  Maintain that arched back and deadlift.
Common Faults: rounding the back as the athlete transitions off the box; resting their weight on the bar;  not shifting the shoulders over the bar as they move off the box; shifting the weight into the toes.

Box Deadlift Low Start from Force Distance Time on Vimeo.

Deadlift: Standing Start
Finally the test is to perform some real deadlifts, but the athlete still has to prioritize the arched back.  This variation begins each rep with a Cat Cow stretch so the athlete can reinforce the good position before deadlifting.
Set Up: Stand with your hips between hips and shoulder width apart. Roll the barbell back until it touches your shins.
Execution: Place your hands on your knees and perform a few Cat Cow stretches. Maintain a tight arch and bend your knees to get your hands on the bar. Once you have your hands on the bar and your back is arched, try to lift your butt slightly to tighten your hamstrings and then deadlift. Try not to look at the bar when you grab it.
Common Faults:  rounding the back as you grab the bar; not bending the knees to get the hands to the bar; looking at the bar as you grab it; shifting the weight to the toes.

Deadlift Setup: Standing from Force Distance Time on Vimeo.

Proportions and Squats

I love watching this video.

Sometimes Wrong is Right

76860_10150123872834062_2587584_nI spend a lot of time fixing people’s squats.  A lot.  I’m really good at it.  I often find that my best success in fixing a squat comes when I have them do it wrong.  It’s a great paradox and one that many people have a hard time accepting but it works.

Many people fall backwards when they squat and their knees cave in and their weight shifts into their toes and their heels lift.  Classic errors.  When working with them I ask them what they are focusing on when they squat and the answer is always “Keeping my chest up.”  I ask “Why?”  They respond, I was told “I have to be upright when I squat.”  It is that motivation to have their squat be more upright that causes their squat to look like shit.  If you insist on trying to remain upright when you squat at the expense of all the other points of performance then you will forever have a shitty squat.  If you are reading this and you can squat upright and keep your heels down and knees out and go thr24384_409505069061_1457955_nough a full range of motion and lift heavy weights, then continue to do so.  That’s great.  However, many many people cannot and, for the foreseeable future, should not bother with trying to maintain an upright torso.

Please remember that I am not saying they should round their backs.  A neutral spine should be maintained under load always, but the angle of the torso can shift to nearly horizontal while maintaining a neutral spine under load.  Do not confuse “good” with “optimal.” An optimal torso angle is closer to vertical but a good squat with a non optimal torso angle is better than an upright squat on your toes.

We often refer to uprightness in a squat as maturity and horizontal as immaturity.  Think about why that is.  A more mature and experienced lifter that has more years under her belt can evolve to a more mature position, but a beginner lifter will often have to train in less optimal positions before they can even access more demanding positions.

Here is why the immature squat works better for many lifters:

  1. They are better balanced. An athlete that is out of balance is inherently unstable and cannot access muscular control when the nervous system is preoccupied with not falling down.
  2. An immature squat allows the hips to sit back further and puts tension in to the posterior chain. Once the glutes and hamstrings are on tension they can fire better to drive the knees out and pull the knees back allowing more weight to settle into the midfoot and heel.
  3. An immature squat properly loaded can help strengthen the back muscles which allows the squat to be a great assistance exercise in developing the deadlift, clean and snatch which require the spine to loaded in a similar position.
  4. Greater flexion at the hip reduces the amount of flexion at the knee and ankle to achieve proper depth thus it is easier for athletes to squat to depth with their feet flat on the ground.
  5. It reduces a lot of knee pain symptoms associated with squatting upright.  Primarily due to greater recruitment of the glutes and hamstrings as well as the reduction on knee flexion.

It’s okay if you don’t believe me, but find the worst squatter in your gym and see if it works on them.  Don’t judge a squat by how it looks, judge it by it’s functionality.  Can the athlete maintain a balanced position? Can they go through a full range of motion?  Can they have their knees track their toes? Can they maintain a neutral spine?  If these criteria are met, then don’t worry about how it looks.  Let your athletes get strong with good mechanics.  Once they have a better base of strength and have more experience, then go back in and see if you can improve their positions.

What about catching cleans and snatches?  Maybe make your athletes get good at power cleans and power snatches before rushing to get them down into the bottom and receiving load in a bad position.  Do not be in a rush.  You can’t cram for strength.  Crawl. Walk. Run.


The WOD Doc!

I was so blessed to be on two episodes of the Wod Doc this week. If you aren’t following him on social media or watching his videos, then you are missing out. The Wod Doc, a/k/a Tim, and I go way back to when I did his CrossFit Level 1 seminar back at my old box, CrossFit Virtuosity. Now he’s coaching and putting out videos and changing people’s lives. Spending a few hours with him, I was really moved by how many people came up to him and thanked him for his work. I see him at Regionals and at the Games working on athletes and I know athletes are at home in front of the computer benefitting from his work every day. I have to take this opportunity to thank him as well. I can’t wait to work with him again and to hopefully beat him in a workout one day.

This first video is Panda Stretch which was made famous right here! Since Wod Doc saw it go viral he had to have me talk about it a little and give him a quick demo. Here we see how to bias that full hip flexion first and then pull length into the hamstring by slowly straightening the knees. We also talk a little bit about down regulation and trying to stimulate the para sympathetic nervous system by breathing slowly and deeply and letting the back of the neck relax.

In this next video I introduce you to the Panda Stick. It’s PVC pipe with a rubber super ball taped to the end of it. I showed Tim the “R Cubed” diagnostic: reach, rotate and raise. Lying in child’s pose you reach the arm straight ahead, externally rotate the palm to the sky and then raise the arm off the floor. In the prone position you are biasing a slightly flexed spine, similar to a hollow position, and capturing full knee and hip flexion (hopefully). This allows us to see what your shoulder is truly capable of without compensation from a downstream joint.

We used the R Cubed as our test and re-test and used the Panda Stick for a little scalene release. I show the “Pin, Spin & Mobilize” technique from Yoga Tune Up. It’s a great technique to use on a delicate area like the scalenes which are sensitive to a lot of compressive pressure.

The Power of Asymmetry

Most of us have blind spots: areas we do not propriocept well.  These blind spots hide in the movements we never do, but also live in the movements we do all the time.  Sometimes it pays to take a fresh look at some movements we know well to see if we can discover these blind spots.  I have a few exercises that I do for squats and lunges to help me break out of my routines.  I find these are extremely useful in targeting imbalances and in strengthening my core.  I learned these from Raphael Ruiz and am passing them on to you.

I will start with the squat variations which progressively get more challenging and then show you the lunge variations.  I recommend you video yourself doing these and watch them back to see how your body reacts to the uneven loading (just from watching these videos I see some areas that need improvement in my squat), also video your regular squat before and after doing these to see if there is a noticeable change in your squat.  Perform the squats slowly enough to feel where you lose balance or integrity and can reclaim it.  Roughly a 2 to 4 second descent with a 1 to 2 second pause in the bottom is good to get the most out of these squats.

Variation 1

Off-axis back squat.  Take a barbell place it on your back as far to one side as you can manage.  Try to stand symmetrically and keep the bar horizontal.  Perform 5 back squats trying to remain symmetrical.  Shift the bar to the other side and repeat.

The stimulus varies depending on how upright or “mature” your squat is.  For a vertical squat, the challenge is to avoid side-bending.   What you find is that your obliques work extra hard trying to keep you balanced.  For an immature squat, the stimulus is rotational in nature and you will be using your lower back muscles and obliques to counter rotate and keep yourself squared.

SquatsOffset1 from Force Distance Time on Vimeo.

SquatsOffset2 from Force Distance Time on Vimeo.

Variation 2

Barbell tip drops.  Use the same off-axis barbell position.  Perform a squat and hold the bottom position.  Now slowly bend sideways and touch the long end of the barbell to the floor and come back up to neutral before standing.  Perform 5 reps on each side.

This variation requires you to surrender your good squat position into a very unstable, off-balance position and then reclaim good position.  It will definitely work your core very hard as well as increase your strength and confidence in the bottom of the squat.

SquatsTipDrops from Force Distance Time on Vimeo.

LungeTipDrops from Force Distance Time on Vimeo.

Variation 3

Unilateral, Posterior to Anterior Banded Squats.  Tie a band to your squat rack and loop the end over one side of your barbell.  Walk out until you feel the tension is strong but not pulling you out of alignment.  Do a set of 5 squats.  Repeat on the other side.

Now instead of gravity’s usual pull down, you are contending with a rotational torque trying to spin you around as you squat.  This unusual force will cause many new sensations and cause you to focus on many muscles that you often do not focus on when squatting.  Screwing your feet into the ground and driving your knees out becomes the best strategy for stabilizing against this force.  Also the pull from back to front will encourage you to lift your chest and cultivate a more upright posture in your squat.  I found this to be a great corrective exercise for people that squat unevenly.

SquatsAsym from Force Distance Time on Vimeo.

LungesAsym from Force Distance Time on Vimeo.

You should always be striving to master the basics.   Using variations like this to challenge yourself is a great way to build confidence in your mechanics, to uncover imbalances and to correct them.  Give these a try and let me know what you think.

Get Loaded Get Twisted Get Loose

Here is an advanced set of hamstring stretches that you should definitely respect. These are aggressive and awesome, but you should be aware of the contra-indications. Do NOT do this if you suffer from any of the following: herniated discs, hyper-mobility (including double jointedness, “trick” joints, Ehlers-Danlos syndrome, or a previous history of dislocating joints), low blood pressure, or are pregnant. Seriously, don’t mess with this stuff.

This series of stretches is for those of you that suffer from really tight hamstrings and are generally well-muscled. I wouldn’t recommend it to most people that don’t lift heavy weights regularly. Furthermore, I would NOT do this prior to a workout as static stretching like this can weaken the posterior chain in the short term. Do this when your muscles are warm after a work out.

This is a series of weighted forward bends. In yoga the pose would be called weighted uttanasana. This article will explain how to do it safely and show you some exciting variations that will stretch your hamstrings like never before. Here is what you need: a box or a bench to stand on, a very firm yoga block or one or two large weight plates (I have a 55lb plate in the pictures), and a relatively heavy weight (10-20kg for women and 20-32kg for men).

As a general rule, I would do all of the following exercises unweighted at first to get a feel for them and to make sure the equipment is stable. Once you feel comfortable with the movements, add weight. There is a sweet spot when it comes to how much weight you should use. These are passive stretches and you should be relaxed and breathing slowly and deeply throughout. You should spend a minimum of 30 seconds in each stretch and gradually work your way up to 2 minutes. A weight that feels light at first will feel a lot heavier at the end of 2 minutes. A weight that is too heavy will cause you to be tense and you will not be able to stretch as effectively. I recommend an unloaded barbell or a kettlebell to do these exercises. The barbell is nice because you can load it very gradually. However, the barbell takes up a lot of room and can roll off your box if you try to rest it there. A kettlebell takes up less room and doesn’t roll away when you leave it unguarded. However, you cannot adjust the weight of the kettlebell, so you’ll probably need to have a couple to choose from to find the correct weight.

The first exercise is called a “Jefferson Curl” or a “Weighted Roll Up.” Stand up tall with your feet together. Slowly roll your chin down into your chest, then roll your shoulders forward and start to round over one vertebra at a time until you hands are down by your feet and your head is in looking at your knees. Hold at the bottom for a few seconds and then slowly come up by tucking your tailbone under, stacking your spine up tall starting at the bottom until your shoulders and head come up last. Your hands should slide down and up your legs throughout the performance of this exercise. Most likely you’ve done this in some yoga class somewhere. Now stand on the edge of a box with your whole foot on the box but your toes very close to the edge. Hold the weight in front of you resting on the front of your thighs with your arms long and straight and relaxed. Perform the same exercise letting the weight slide down the front of your legs. Watch out for your toes and let the weight lower past the edge of the box as far as your flexibility will allow. Hold for a few seconds and then roll back up slowly. Perform 5 slow repetitions.

Weighted Uttanasana. Perform a Jefferson Curl but hold the bottom position now. Breathe long, slow, deep breathes. Five deep breaths is a good start. Eventually you want to put a stopwatch on the floor in front of you so you can check in. Gradually work your way up to 2 minutes. Most people cannot straighten their legs all the way. If you find it difficult to straighten the legs, bend your knees deeply, place your belly on your thighs, take a big inhale and as you exhale try to straighten your knees while keeping your belly on your thighs. Do not let the weight swing forward, keep the weight close to the box. It’s okay if it rests against the box (closer is better). Don’t rock your weight forward into the toes, be sure to keep your heels down. Be careful as you stand up, you might experience a head rush. I have my athletes work in pairs and spot each other. Try to do these somewhere that has mats and padded floors and somewhere that you can drop the weight if you suddenly feel lightheaded or off balance.

uttanasana2

uttanasana1

profile2

profile1

Weighted Asymmetrical Uttanasana. I learned asymmetrical uttanasana from Jill Miller. It is a great hamstring stretch but it also causes your femur to get pushed deeper into your hip socket (joint approximation) which feels amazing and helps your hips function better. I, of course, decided to take it to the next level and add weight to it because it makes it even more awesome. Place a yoga block (do not use a squishy foam block. Cork or wood only.) or weight plate on your box. The thickness should be between 2 to 4 inches. Place your feet parallel and symmetrically next to each other so both feet are pointed straight ahead and the toes line up with the edge of the box. Perform the Jefferson Curl with weight and hang down. Again breathe slowly and deeply. Initially, you will not want to put weight into the elevated foot, give it time. Slowly breathe and keep trying to shift your weight back and forth until you feel it is even between both feet. Bend and straighten the knees in time with your breath if you need to. The sensation of the forward bend changes entirely when you are asymmetrical. I suddenly feel it deep inside my hip joint and in my lower back (quadratus lumborum). Before switching sides test your squat or your deadlift setup (or both). You’ll notice the ability to squat deeper on the side that was elevated and notice that the elevated side feels much better in the deadlift setup and the hip will be further back. Repeat on the opposite side.

right1

left1

Weighted Asymmetrical Uttanasana with a Twist. Repeat the Asymmetrical Uttanasana now and while you’re in the bottom position let go of the kettlebell with one hand and reach that hand up to the ceiling, while turning your head and following it with your gaze. Hold this position and breathe and try to broaden across the front of your chest. After about a minute switch hands and twist in the opposite direction. One side will feel much more difficult because of the asymmetry. That’s okay. Keep breathing. Switch your feet and repeat the twists.

right3

right2

left3

left2

Take your time and try to accumulate about 5 to 10 minutes of total time playing with these variations. Bigger muscles require more work to stretch so use a little weight and apply pressure over time to make changes in those hamstrings. Consistency with these stretches will pay off.

Special thanks to my models: Samantha Star and Mike Aidala. Follow them on instagram @lithiumkitten @Mike.Aidala

Shoulders Up?

There is a debate that is still raging on about whether to push your shoulders up or pull them down. This is in reference to the overhead position seen in handstands and some weightlifting moves.  Many schools of thought say the shoulder, or more specifically the scapula, should be depressed when overhead because that is more stable. However, gymnastics and weightlifting coaches often cue “push the shoulders up into your ears.”

What is the correct answer? It depends.  I will examine this from several perspectives.

As an initial point of reference, I refer the reader to Star Trek 2: The Wrath of Khan.  Khan was defeated in the end, because he suffered from two-dimension thinking.  Kirk was able to get the jump on Khan by using three-dimensional maneuvers.  In order to understand the shoulder we must think in three-dimensions.

Overhead we seek to create stability.  The body has two basic ways to create stability: active and passive.  Our body defaults to a passive stability all the time: when we lean our hip over when standing in line; when we rest our chin on our chest while texting; or when the arch of our foot collapses and rests on the ground.  A passive stability is where a joint moves into some end range where, because of bone-on-bone restrictions, it can no longer move and is therefore “stable.”  An active stability is created with muscles and bones working together to create position that is strong yet also has movement options.  For example, externally rotating the hips to create stability in the hips that also allows for strong stable hip movement.  See squatting.

The shoulder, much like the hip benefits from active stability through external rotation.  That’s why our rotator cuff is so important: the Teres Minor and Infraspinatus externally rotate the humerus to create stability.  That is not the only mechanism for stability.  The shoulder is a complex system made up of the humerus, scapula and clavicle.  The scapula and clavicle anchor themselves on the axial skeleton (spine and ribs) and, therefore, the core musculature must stabilize the axial skeleton for the scapula and clavicle to be secure and stable.  A weak core leads to a weak shoulder.

A cue is just a cue.  When you hear the cue “shoulders up”, you shouldn’t mistake that for complex anatomical discourse.  It’s merely a direction designed to elicit as certain action from the athlete.  For example, if I cue someone to lift their chest up during a squat, I don’t care about their chest.  I care about their back and that I see it rounding.  Asking the athlete to lift their chest can create a series of events by which they engage their spinal erectors and bring their spine back to neutral or at least stop the flexion fault that is occurring.  It is a very quick shorthand to fix a fault.  Cues can create other faults.  I might cue an athlete to lift their chest and a series of events might unfold where the athlete goes into over extension of the spine and rocks their weight forward onto their toes.  That is a cue misapplied.  it’s not the cue’s fault, it was merely the wrong cue for that athlete.

When I cue “shoulders up” what do I want and what do I not want?  I want my athletes to actively push against gravity.  Always.  I am strength and conditioning coach and overcoming gravity is the means by which people get stronger. In a plank position, I want my athletes to push down on the ground until the scapula protract and their upper back starts to look slightly rounded (kyphotic).  I also want them to externally rotate so that the pits of their elbows face forward.  So I verbally cue “push the ground down.”  I also might give them a tactile cue of putting my hand on their upper back and tell them to push their upper back into my hand.  I would also tell them to screw their hands into the ground to create external rotation.

When the athlete goes into a handstand the same holds true.  I want the athlete to push the ground down.  I want them to externally rotate.  This is optimal.  What we see is that shoulder flexion and external rotation are both necessary components but there is a tension that exists between them, however they are not at odds.  If I cue “shoulders up” it is because I see an athlete that is not pushing down into the ground and is lazy through the shoulders.  However, I do not want to see my athlete push their shoulders so far up that they internally rotate and lose stability.  As is always the case when working with humans, they are fallible and they can misinterpret directions.

What we see can be misinterpreted.  The eye is fallible.  We need to embody these techniques and it is impossible to understand lifting heavy without lifting heavy.  We can get away with a lot of things that seem right in theory but if that theory does not work when applied to maximal loads then the theory was wrong.

Here is what I see: when I drive my shoulder all the way up to my ear, my humerus internal rotates.  When I actively externally rotate, the humerus screws itself back in and the shoulder appears to drop slightly.  When doing this in the mirror, it looks like I am depressing my scapula.  Under load we might end up in essentially in the same place but the muscular action is quite different and important.  Under heavy load the need to tell an athlete to depress is obviated by the fact that A HEAVY FUCKING LOAD IS PUSHING DOWN ON THE ATHLETE!  The athlete’s job is to PUSH AGAINST THE HEAVY LOAD.  This action of pushing is tempered by the act of also having to externally rotate.   Thus the cue would be to “break the bar.”  The best analogy I can give is to that of a screw vs. a nail.  We do not merely hammer our shoulders up into position, we push up and screw in to create stability.  It’s important that we remember that we are working in three dimensions and there is not one simple cue that will fix everything.

Cueing the Overhead Position from Force Distance Time on Vimeo.

Overhead strength from Force Distance Time on Vimeo.